Most FPV pilots head to the field carrying a small mountain of gear: a radio in one hand, goggles or a separate screen in the other, plus a bag of receivers, antennas, and cables tying it all together. It works — but it has always bugged me. Why are the two things I stare at most, the controls and the video feed, living in two separate boxes?
So I stopped asking and started building. Meet the BERT RC Controller — a single handheld unit that fuses a fully custom ESP32-based radio with a long-range RubyFPV digital video ground station. One device. Two brains. Everything I need to fly, in my own design, down to the last toggle switch.
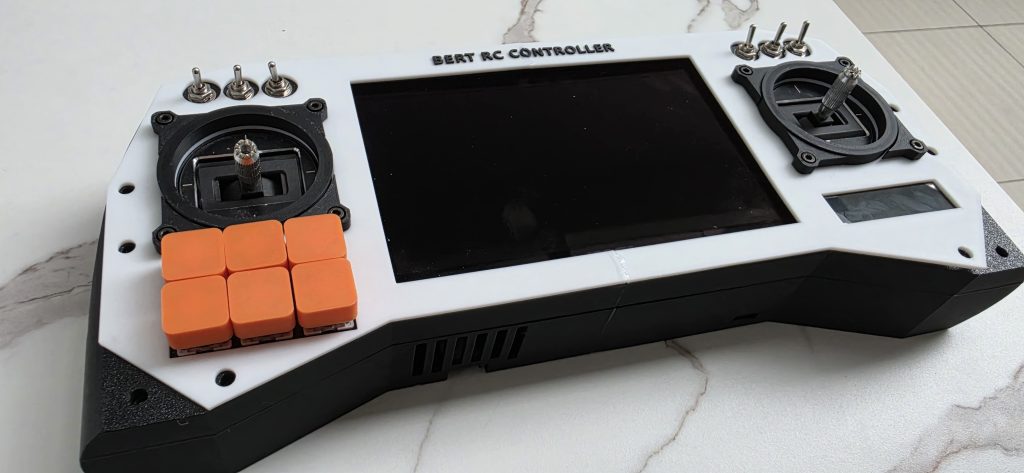
Here’s a first look at the build.
The control heart: ESP32 with custom RC firmware
At the core of the radio side is an ESP32, running firmware I’m writing from scratch rather than flashing something off the shelf. Going custom means I’m not boxed in by someone else’s menu structure, channel limits, or mixing logic — I decide exactly how every input maps to every output, how the UI behaves, and how the link is configured.
The ESP32 is a fantastic brain for this: dual-core, plenty of headroom for reading the sticks and switches in real time while simultaneously driving the display and talking to the radio module, all with Wi-Fi and Bluetooth sitting in reserve for future features. This is the part of the project I’m most excited to document, because the firmware is where a pile of parts turns into an actual transmitter.
Contactless precision: dual Hall-effect gimbals
The two sticks are Hall-effect sensor gimbals, and if you’ve only ever flown radios with traditional potentiometer gimbals, this is the upgrade you feel immediately.
Instead of a wiper physically scraping across a resistive track, Hall gimbals read stick position magnetically — nothing touches, so nothing wears out. That translates to smoother, more linear control, no scratchy center detents developing over time, and far less drift after months of hard flying. For a controller I plan to actually depend on, contactless sticks were non-negotiable.
Switches, buttons, and channels
There are ten toggle switches in total — six on the front face flanking the gimbals, plus another four mounted along the top edge of the controller where my fingers naturally rest. On top of those, a tidy 2×3 array of chunky orange momentary buttons sits in the lower-left of the faceplate. Together that’s a genuinely generous spread of physical inputs to assign — arm/disarm, flight modes, buzzer, VTX settings, camera triggers, you name it.
Mapping all of that in firmware is half the fun. Because the logic is mine, a single switch can do something simple like a 2-position channel, or something clever like cycling through a menu — and with ten toggles plus six buttons, I’m not going to run out of channels any time soon.
The RF link: ExpressLRS for serious range
Sticks and switches mean nothing if the signal can’t reach the aircraft, so the radio talks to the world through an ELRS (ExpressLRS) module. ELRS has earned its reputation for a reason — extremely low latency, rock-solid link recovery, and the kind of long range that lets you push out confidently. The ESP32 feeds it the channel data, and ELRS handles getting that data to the model cleanly and reliably.
Eyes-on telemetry: the 2.25″ TFT
Right on the face of the controller sits a small 2.25-inch full-colour TFT display. This is the radio’s at-a-glance dashboard — link quality, battery voltage, active model, switch states, telemetry coming back from the craft, and whatever else I decide matters in the moment. No phone, no companion app, no guessing. The information lives where my eyes already are.
The other brain: a RubyFPV HD ground station
Here’s where the BERT RC Controller stops being “just a radio.” That large screen dominating the centre of the unit is a serious piece of glass, and behind it is a completely separate video system running RubyFPV on a Raspberry Pi 4B (2GB).
For the video link itself, I’m running two BL-M8812EU2 Wi-Fi modules. RubyFPV uses these in a way that gives you genuinely high-quality, long-range digital video — diversity reception across both adapters means a more robust feed and fewer dropouts as you get further out or fly behind obstacles. The result is an HD picture that holds up where analog would have turned to static.
And that centre screen is no afterthought. It’s an original Tianma IPS panel — the same native touch assembly used in handhelds like the ROG Ally and MSI Claw — so the FPV feed gets a display worthy of it:
| Spec | Detail |
|---|---|
| Size | 7-inch IPS |
| Resolution | 1920 × 1080p (314 ppi) |
| Refresh rate | 120 Hz |
| Response time | 7 ms |
| Brightness | 500 nits |
| Contrast ratio | 1000:1 |
| Colour gamut | 100% sRGB |
| Aspect ratio | 16:9 |
| Touch | 10-point capacitive (original Tianma assembly) |
| Connectivity | Single-cable USB-C, mini-HDMI |
| Dimensions | ~167 × 109 × 9 mm |
| Weight | 194 g |
| Shell | CNC-machined aluminium alloy |
| Extras | Built-in speakers, volume/brightness scroll-wheel keys |
A 120 Hz, 1080p, 500-nit panel is overkill in the best possible way — bright enough to actually see in sunlight, fast enough that the feed feels live, and sharp enough to read OSD details at a glance.
The shell
All of it lives inside a two-tone 3D-printed enclosure — crisp white faceplate, black body and grips, with “BERT RC CONTROLLER” embossed proudly across the top. Designing the case is its own rabbit hole: gimbal mounts, switch cut-outs, the screen surround, ventilation, and grips that actually feel good after a long session. Seeing the printed shell come together with the electronics dropping into place is one of the most satisfying moments of any build.
What’s next
Right now you’re looking at the hardware taking shape. The real work — wiring it all up, writing the ESP32 firmware, getting the gimbals calibrated, bringing the RubyFPV ground station online, and tuning the whole thing into a controller I’d actually trust over my models — is just beginning.
I’ll be documenting every step: the schematics, the firmware, the 3D files, the wins and the inevitable head-scratchers. If you’ve ever wanted to build your own radio instead of buying one off the shelf, this series is for you.
Stay tuned for the next post, where the build officially begins. 🚁